THE MATERIALS
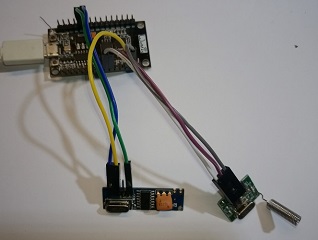
For the project we need:
- a Wemos D1,
- a set of rf receiver and transmitter
- Optional an usb powersupply
- 6 short duport wires.
The stuff can be purchased on ebay for less then 6 dollars together. The transmitter can be one of the types that are used in the official RFLink Gateway, see their website for more information. The stuff that used to test with, you can see on the pictures.
HARDWARE
This is a short story. Connect the transmitter and the receiver to the Wemos as shown in the schematic (see pictures).
For questions you can mail to [email protected]
THE SOFTWARE
I started with downloading an installing the software from gitthub. This did't work well, ofcourse, as in so many cases. Downloaded software never seems to work out of the box. In this case, the communication with domoticz didn't work. So i had to dive into the software to find out how it behaves. Finally i had it working but i was not very happy with it. All settings had to be done via the serial monitor or a telnet terminal. Difficult for noobs! Since we have an ESP, why not doing this all via webpages?
First i replaced the autoconnect part with my own wifi config portal, which i find much more elegant and more intuitive. I changed the time management as well.
Next i started to develop the webpages for registering devices. When this worked i could remove the functions that previously did this via the serial monitor. Now the progam was more compact so i could add the remote. And that makes it a stand alone bridge for Klikaan Klikuit (CoCo) domotica sets.
Since there was enough programspace in the memory, i decided to add a timer for each device. By assigning one device to multiple buttons we now can configure more complex switching scenario's.
Flashing the software
With the Wemos and Arduino IDE installed on your computer, this is very simple. A binary can be installed with ESP8266_flasher.exe or ESP DOWNLOAD TOOLS. Find the instructions on the internet with google.
IN PRACTICE
How does this work? We can register our CoCo remote very easy, all via the webinterface. We put the device in learning mode, push a button on the remote, save and that's it. Now we can access the on-line remote with our telephone, laptop or computer. Put a KaKu device in learning mode, click a button on your screen and the device will listen to this button from now on.
The number of buttons of the remote is userdefined and can be set to 9 buttons, an "all off" button is also present.
An other feature is the communication via Mosquitto, which means that we dont have to connect to Domotics via the serial cable. Domotics can simply issue commands to the device, and get answers too.
